Thursday, October 31, 2013

Learn how to wirewrap a pendant - feature in the new Bead Me FREE online magazine

Follow Me on Pinterest


Hey Crafty Friends!

I'm in the studio this week creating jewelry up a storm to get ready for my show in November!  But look what just popped in my email box!!

My friends at Ashdown publishing based in the UK have just released a brand new beading magazine called BEAD ME which features US jewelry designers!  I'm please to have a couple of my projects based on my MetalWork Jewelry book featured in the magazine.

You're gonna love this! It's so interactive and easy to use and read on my new iPad mini (thanks hubby!)

These magazines can be viewed on your tablet or smart phone - click here to download the app (it will take you to the website)


Happy Beading everyone! 


Don't miss out! Subscribe to my free project tutorials, videos and tips to help you in your creative home and business life!
Enter your email address:


Delivered by FeedBurner

Monday, October 28, 2013

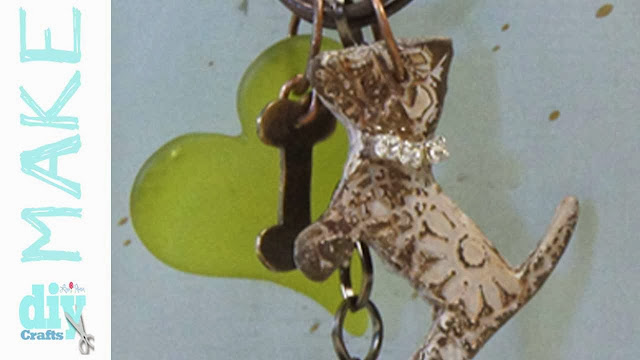
How to create vintage aged metal using UTEE - For all doggie lovers! + Video

Follow Me on Pinterest


Hey DIY crafters!  Today's Mixed Media Monday really delivers a mix of media!  Recently, I gave myself a play day.  You would think I play everyday and I kind of sort of do, but generally, I'm playing with a particular goal or project in mind.  It is very hard for me to shift gears and say "It's okay to play and not make anything and mess up and make mistakes and just discover".

I've been wanting to create something with the doggie dies I have from the Spellbinders Media Mixage line and so this was included in the play day.  I also dug out some UTEE (ultra thick embossing powder) and chipboard.  What I discovered is this technique that looks like a painted rusty metal of sorts and other times, depending on the color you paint it, can look like glazed ceramic.


UTEE has a natural tendency to turn brown as it cooks in the melting pot.  I don't know how to prevent this, but at the same time, because I love vintage, the color gives a very nice aged appearance and so for this technique it is quite desirable.

I'd love to hear what you think of this technique and video.  Please leave your comments below

Click here to see the video on my youtube channel -
Please don't forget to subscribe! (P.S. - You're gonna love next weeks video too!)


How to make the Doggie Pendant!
Spellbinders Supplies:
MMM-001 Spellbinders® Artisan X-plorer™ machine
MD2-005 Spellbinders® Media Mixáge™ Dogs One die template
Heavy chipboard
Ultra Thick Embossing Powder Clear  (UTEE)
Rubber Stamps with a deep impression
Acrylic paint in base color of choice
Antiquing glaze
Cosmetic Sponges
Tweezers
Melting pot
Craft knife
Scissors
Non-stick work surface

Optional Spellbinders® Media Mixáge™ die templates:
MD2-011 Spellbinders® Media Mixáge™ Birds One
MD2-009 Spellbinders® Media Mixáge™ Hearts Three


Optional jewelry supplies
1/16” hole punch * jump rings * beads * misc. charms * Wire * round nose pliers * wire cutters * chain * toggles or clasps


Cut out the dog shape from heavy chip board using the Artisan X-plorer™ machine.  Cut through the remaining thin layer with a craft knife.

Heat UTEE  to recommended temperature inside the Melting Pot. 

Immerse chipboard into the UTEE. 

Remove chipboard from UTEE with tweezers and place onto non-stick work surface

Press rubber stamp over shape and leave stamp until completely cool.

Remove stamp and trim away excess UTEE from around edges with scissors. 
HINT:  use the side of the Melting pot to re-melt the edges on the shape.  This will refine the shape and soften the edges on the chipboard

Paint with acrylic paint and let dry.

Lightly rub with antiquing medium.  The medium will soften some of the paint and remove it from the raised areas giving it a worn metal look.

To assemble into jewelry, punch a hole into the shape where desired.  Insert a jump ring.
Attach all elements to focal wire pendant using jump rings.  String onto chain or cording and secure with a toggle clasp.
Don't miss out! Subscribe to my free project tutorials, videos and tips to help you in your creative home and business life!
Enter your email address:


Delivered by FeedBurner

Thursday, October 24, 2013

Friendly Plastic TV - Video How to create Filagree Embellishments - Vintage Bag

Follow Me on Pinterest


For the past couple of days, my mind has been spinning with ideas and I'm trying to keep up with them all!!

Working with Friendly Plastic is always so much fun and relaxing.  It's easy to get caught up in the manipulation of the plastic and just let your worries and cares float away.

In this video, I'm sharing how to create a vintage inspired filigree embellishment using a technique that I learned from Liz Welch.

Combine this technique with some vintage elements and a pre-made bag - it's simple and quick - just the way I like things!

P.S.  - The bag was a muslin jewelry pouch that I bought in bulk.  I sprayed it with Tsukineko Walnut Stain in the Terra Cotta color and let it dry, then added some decorative beaded and lace trim.  EASY PEASY!!

Please take a moment to subscribe to my youtube channel if you haven't done so already.  I'm on a roll of uploading weekly and sometimes - bi-weekly videos.

 Click here to view the video now - http://youtu.be/UFgNzaf72P4

Leave a comment and you'll be entered to win this fabulous hand embellished bag!!  HURRY - This closes on Sunday!!


a Rafflecopter giveaway
Don't miss out! Subscribe to my free project tutorials, videos and tips to help you in your creative home and business life!
Enter your email address:


Delivered by FeedBurner

Tuesday, October 22, 2013

R & R with the Scrappin' Sisters

Follow Me on Pinterest


Jenn Hen stamped these adorable book marks as a souvenir of our time together.


A few times a year, a group of girlfriends and I get together for some scrappin, sisterly love and well, the constant food supply.  In reality it's all about the friendship and food, so we should really change this from R & R (rest and relaxation) to F & F (friendship and food) which ultimately leads to food coma's which result in relaxation.

We laugh, we giggle and sometimes, we actually make stuff....

Jenn Hen stamped those adorable book marks (above) as a souvenir of our time together.


Ever since Donna Sue learned how to use my Grand Calibur machine from Spellbinder's, she's been on a roll making cards! She helped another friend Donna O make these cards for some special people in her life.   She puts so much love and thought into her cards - they're a gift in themselves.

Sherry O spent the weekend behind the sewing machine making these cute hats which we were all the head manniquins for .....


She turned the left overs into headbands.....


 but what we all discovered is that they are really instant facelifts.... just check out the photos and see for yourself...........


That's Dixie's before and after photos!!! She's so cute - she's the Innkeeper's wife :)

I always get the award for super duper mess maker.....


but hey I was a busy girl....


And on the other side of the table....Mariah was busy making journals....  We're getting ready for a craft show in a couple of week.  We've both been accepted to attend an international convention next year in London and so all the proceeds of our creativity are going to make sure we get there!...


She does such a great job...


Jean M made recipe books - they were so beautiful and ...oohh...what a great gift to give  and share some great handed-down family recipes.


Well...we'll be back again to BlackBerry Creek B & B in December - hopefully for a 4 night retreat!! Thanks to all my friends for such an amazing time together and thanks to our hosts Mark and Dixie for a great place to stay, hang out with friends and EAT.  Please be sure to check out BlackBerry Creek B & B on Facebook.


Don't miss out! Subscribe to my free project tutorials, videos and tips to help you in your creative home and business life!
Enter your email address:


Delivered by FeedBurner

Monday, October 21, 2013

Mixed Media Monday - Create a fall inspired art tag + New Video

Follow Me on Pinterest


I love everything about fall and find the colors especially inspiring.  In creating this tag, I wanted to combine the shapes of the die templates with a variety of textures and colors that reflect the season.  This tag is the perfect size for a door hanger, an ornament or even a very fun gift bag tag – you could even personalize the banner!   


Make a Fall Inspired Bird Swing Tag

Spellbinders Supplies:
MMM-001 Spellbinders® Artisan X-plorer™ Machine
MD2-011  Spellbinders® Media Mixáge™ Birds One die template
S5-120 Spellbinders® Fall Foliage die template
MD1-004 Spellbinders® Media Mixáge™ Triangles One die template

20 gauge steel annealed wire
Wire screen mesh (from a hardware store)
Tsukineko® Staz-On ink – Rusty Brown and Mustard
Muslin fabric strips
Twine – about 3”
1/4” diameter wooden dowel rock approximately 3” long
Newspaper
Burlap (strands from the fabric)
Misc buttons
Modeling paste
Popscicle stick or palette knife
Acrylic paint – black
Cosmetic sponge
Permanent Marker – fine tip
Tacky Glue

  
Cut one bird from wire screen mesh with the #2 (with #1 being the smallest) Birds One die template set. 

Cut three newspaper leaves using  the Green Maple small die from the Fall Foliage die template set

Cut four triangles using the #1 triangle from the Triangles One die template set

Spread an uneven layer of modeling paste onto the wire bird with popscicle stick and let dry.

Paint bird black with acrylic paint using a cosmetic sponge and let dry.

Apply ink to leaves using a cosmetic sponge.

Use a permanent marker to write letters onto triangles for banner.   Glue triangles to a piece of twine

Wrap the end of a length of wire around the end of the dowel rod and twist to secure.  Trim off excess wire.  Bend the wire around to the opposite side and repeat this step. 

If desired, you can wrap additional wire around the outside wire to give it a little more bulk. 

Create a wire loop and attach it to the top with wire.

Glue leaves onto swing, followed by bird. Arrange burlap strings and buttons as desired and glue.

Glue banner to top


Don't miss out! Subscribe to my free project tutorials, videos and tips to help you in your creative home and business life!
Enter your email address:


Delivered by FeedBurner

Thursday, October 17, 2013

DIY on the Fly - Check out this mini organizer shelf made for less than $2 + video

Follow Me on Pinterest


I had a little DIY on the fly moment.  I worked most of the summer on my next book which offers Creative Ideas to Organize your Home.  Really it's more creative ideas to organize and decoratively display your clutter....and yes we all have it - right?

I was doing a little creative play yesterday trying to find more ways to neatly organize some stuff to where it looks good and is accessible all at the same time.

The contraption as I call it is really a rebar or angle iron chair that you'll find in the masonry section of Lowe's for about $0.70.  Originally I bought it for a tool stand - which it will eventually become because I have another idea for repurposing it - but the original idea failed miserably.  Guess that just means more play time right?

Check out the video below and please take a moment to subscribe to my youtube channel


Watch the video on youtube- here
More trash to treasure videos - click here


What's your best creative organizing tip?  Let me know in the comments below.


Don't miss out! Subscribe to my free project tutorials, videos and tips to help you in your creative home and business life!
Enter your email address:


Delivered by FeedBurner

Monday, October 14, 2013

Faux Leather Technique - Breast Cancer Awareness Cuff - Mixed Media Monday + new video

Follow Me on Pinterest


October is "Breast Cancer Awareness" month.  It's a personal month for me, because I lost my Mom to breast cancer in 2012.

October is a special month where I remember my Mom and how hard she fought breast cancer before it finally won.  I celebrate her life, congratulate survivors on a fight well fought and cheer on those who are still undergoing treatment.  In a tribute to breast cancer awareness month, I created this cuff with easy to find materials.  The inspiration for it came from all of my creative friends at Spellbinders who embossed leather cuffs for the Emmy’s.  Creating this cuff is easy and would be perfect to make for your BFF or family member who needs a little cheer.

Today, I wanted to share with you a technique on how to create faux leather from craft foam. This technique can be used in a variety of ways and of course if you have leather, this technique will also texture and stamp an impression into leather.

Literally, you can make this bracelet and walk out the door in a matter of minutes!!  Show your support for the fight against breast cancer.

To view the video at youtube click here
Subscribe to my youtube channel for a new video every Monday


Phrase printed on inkjet printer paper
Pink craft foam
1 x 1” glass square bauble
Filigree Findings of choice
Crystals – pink and white
Head pins
Tsuekineko® Memento Luxe ink pad – ML-400 Rose Bud
Double sided tape
2 snaps or use hook & loop tape
Glue stick
Cosmetic Sponges
Scissors
Jewelry pliers
Flush cut wire cutters

Variation:  This same technique could be done with any of the Spellbinders® Media Mixáge™ bezels and using resin.  You may also choose to cut out a square using the Squares two die template, dropping it into the hatpin and filling the bezel with resin.


Print out phrase on ink jet printer. 

Apply glue to back side of words.

Cut words apart and apply them to chosen paper sheet from the Ephemra Papers One booklet.

Apply double sided tape to the back side of the bauble. 

Position bauble over word phrase and cut out.

Glue into hatpin. 

Measure circumference of wrist and add 1”.  Cut a piece of craft foam to this length and approximately 1 to 1 1/2” wide or desired width.

Round the ends with scissors.

Place foam inside the M-bossabilities folder and pass through the Grand Calibur machine using the embossing plate and raspberry spacer plate as the sandwich.

Add ink to cosmetic sponge and rub over raised embossed areas to highlight.

Create a loop in the bottom of the hatpin with pliers and cut off excess pin.

Create dangles on headpin and attach to loops.

Glue hatpin onto filigree base and onto cuff.


Add snaps or hook and loop tape for a closure.


Don't miss out! Subscribe to my free project tutorials, videos and tips to help you in your creative home and business life!
Enter your email address:


Delivered by FeedBurner

Friday, October 11, 2013

Make a fun Pumpkin Cupcake Topper - Quick and Easy Pumpkin Bread Cupcake Recipe + Video how to

Follow Me on Pinterest


Sometimes, oldies are goodies! Today, I travel back to the archives and bring back some of my favorite fall projects.

These pumpkin cupcake toppers have been by far been one of my most popular projects


Pumpkin Cupcake Topper

Linda Peterson

Materials:

Aleene’s Tacky Double-stick sheets (1)
¾ or 1” circle punch
Small flower punch (optional)
Yellow, green and brown cardstock
Toothpick
Orange colored chalk ink
Glitter glue (optional)
Scissors

  1. Apply tacky sheet to the back of yellow, green and brown cardstock
  2. Punch out one yellow circle with the sticky back paper and one without
  3. Cut a wavy line into bottom of each circle and a little notch out of top to form pumpkin shape
  4. Cut two teardrop shapes for leaves with scissors
  5. Cut one log from approximately 1/4” wide by ¾” long for stem

Assembly
  1. Remove adhesive from back of pumpkin.  Apply stem and tooth pick to center.
  2. Place remaining pumpkin shape over back.
  3. Highlight edges with chalk
  4. Apply leaves to front where desired
  5. Embellish with small punched flowers if desired.  Add a drop of glitter glue to the center of each flower.


Press toothpick end into cupcake.


Pumpkin Bread Cupcake Recipe


  • 3 C sugar
  • 1 C oil
  • 4 eggs
  • 2 C pumpkin -- canned, unsweetened
  • 2/3 C water
  • 3 1/2 C flour
  • 2 tsp baking soda
  • 1 tsp cinnamon
  • 1 tsp nutmeg
  • 1 1/2 tsp salt

DIRECTIONS

Mix dry ingredients. Add other ingredients and mix well. Pour in greased loaf pans (2/3 full) Bake at 350 degrees for 1 hour. Makes 3 loaves.


Don't miss out! Subscribe to my free project tutorials, videos and tips to help you in your creative home and business life!
Enter your email address:


Delivered by FeedBurner

Thursday, October 10, 2013

Yo-Momma Monday...on a Thrifty Thursday

Follow Me on Pinterest


Alot of you ask about how I came to be in this creative world I live in.  So recently I did an interview with Amanda From House Parties to House Wife and gave her the 4 - 1 - 1.  You can check out the interview here.   THANK YOU Amanda for the shout out!

Yesterday Mariah and I did a little Thrift shopping.  The craze started earlier this week when we went to Goodwill in Manchester - near St. Louis and found this treasured find - at a mere $12 I swiped this up!


  Mariah found this adorable handbag for $2 at a thrift store for women of domestic violence.

She couldn't resist adding a little somethin' somethin' to it.  We made this fabric heart using Spellbinder's 3D M-bossabilities and letterpressing the design to muslin.  Sewed and stuffed it, added a handle and a metal flower and WOW! What an upcycled find!

THIS is why I love ART! :)

Leave me a comment below and let me know your favorite upcycling or recycling story or technique! :)


Don't miss out! Subscribe to my free project tutorials, videos and tips to help you in your creative home and business life!
Enter your email address:


Delivered by FeedBurner

Monday, October 7, 2013

The Whimsical Owl ATC card - Easy Mixed Media techniques + Video

Follow Me on Pinterest


Happy Monday everyone!

It's time for another mixed media video and today I wanted it to be a fun cherry theme.  When I think of whimsical characters, I think of owls.  I love how owls can be made from simple shapes, created with fun patterns and just seem to bring a smile to my face every time I look at one!

The inspiration for this project came from being at the Michaels Craft Tour event in St. Louis.  I had the privilege of meeting and working with so many people, many of whom were occasional or non-crafters but wanted to learn. 

They shared that they loved mixed media but were scared to try it.  So, in this project, I really take something simple – and familiar like a circle and show how to alter it into a fun and whimsical owl.  These fun ATC (Artist Trading Cards) are easy to make and fun to share!

Have fun gathering a group of girlfriends together and creating and trading.


To Watch the Whimsical Owl ATC Card video - click here
For my mixed media video playlist - click here

Let me know what you'd think of this project in the comments below :)

Please feel free to share the video and google+

Project Dimensions: Varies


Spellbinders Supplies:
MMM-001 Spellbinders® Artisan X-plorer™ machine
MD1-012 Spellbinders® Media Mixáge™ Circles Three die
MD1-001 Spellbinders® Media Mixáge™  Ovals One Die
Patterned paper
White cardstock
Orange foam (small piece)
Chipboard Artist Trading Cards (ATC) 2 1/2 x 3 1/2 wide
Stamp pad in color of choice
Acrylic paint – off white or color of choice
Fine tip permanent marker
Printed phrase from printer
Scissors
Glue

To make the stamp:

S5-143 Spellbinders® Jewel Flowers and Flourishes Die (optional)
Craft foam
Plastic acetate / Quilting stencil material

 A variety of foam stamps can be made with Spellbinders® Media Mixáge™ .  Try mixing and matching shapes and designs to come up with your own unique stamps. 

Cut one circle from patterned paper using  the #3 (with #1 being the smallest)  and two circles from white cardstock using the #1 Circles Three die template set.
Cut two ovals from coordinating paper using the #2 die in the Ovals One die template set.
To create a little divot for the top of the owls head, place the #2 die from the Ovals Three die template set approximately 1/4” down from the top of the largest circle and cut.  The finished shape will look like a circle with a bite taken out of it.
Place both ovals back sides together onto the cutting plate.  Place the #2 Circles One die approximately 1/4” to 3/8” on the side.  This will refine the wing shape. 
Glue wings to body and adjust.
Glue white dots onto front for face.
Draw two black dots with permanent marker for pupils.
Outline eyes, body and wing shapes with marker and draw in scallops for feathers.
Paint the  ATC with base color of choice (mine is a light creamy yellow) and let dry.
Apply ink to foam stamp and stamp design multiple times onto the ATC to create background.
Glue Owl to front and draw in legs.
Glue on words and outline with marker.


Hint:  scan each individual element to create digital versions.  Mix and match your digital elements and resize to create even more works of art quickly and easily.


Don't miss out! Subscribe to my free project tutorials, videos and tips to help you in your creative home and business life!
Enter your email address:


Delivered by FeedBurner

Click on a post

Related Posts with Thumbnails